Start GMAO
First, load up GMAO. Please note that you will have to be online to
use this tutorial (the images and everything are hosted online.)
Load up the test XML file
I have set up a test file that you can use to practice translating
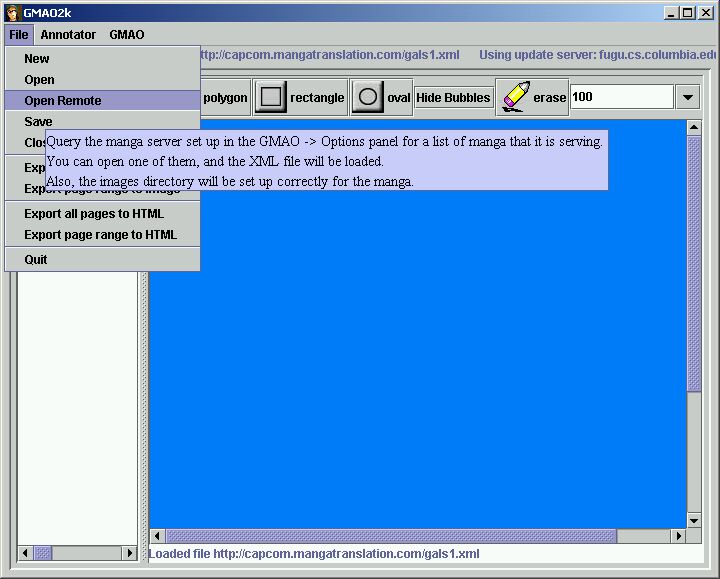
on. To open it, you can use the "Open Remote" menu item in the "File"
menu.
You should see a list of different manga
available (these are the manga that are hosted on the Annotation
server that you are using - probably fugu.cs.columbia.edu).
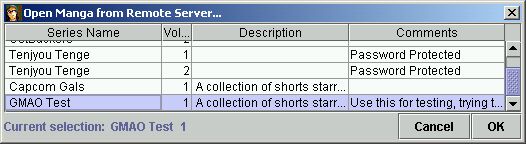
Scroll down until you can see "GMAO Test", select that, and open it.
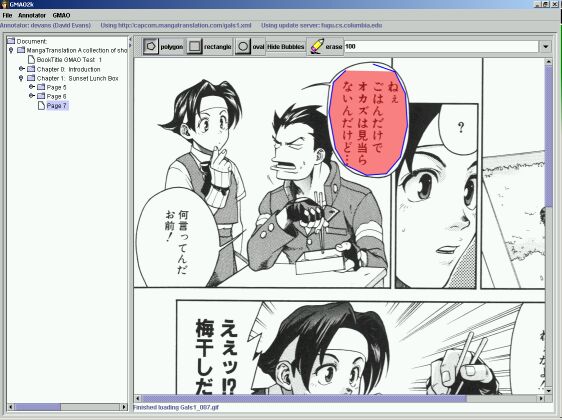
It should load up the XML file. You are now ready to start creating
bubbles and putting translations in them! On the left hand side of
the screen, open up the tree display so you can see what has been
translated already.

In my case, up to page 6 has been translated. Click on the page
folder to load that page up. We want to add a new page. So go to the
GMAO->New Page menu item, and enter the next page.
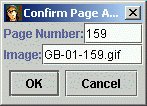
You have to make
sure that the file name it suggests is the correct name, or you might
get a 404 File Not Found error. Generally, it suggests the correct
name. You will have to expand the left hand side again to see the new
page. Click on the blank "Page 7" icon to load up the new page.
Logging In
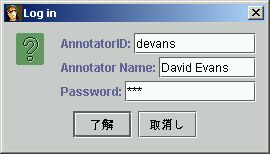
Before annotating, we have to log in. Select "Log In" from
the Annotator menu. If you have never logged in before, you can use
anything you want for your annotatorID (it will be displayed in the
html pages so make sure you don't mind people seeing it) and name.
The password can be anything as well. If you have already logged in,
use the same AnnotatorID, Annotator Name, and Password. Once you have
logged in, you can create bubbles.
Now, select the Polygon (or Oval or Rectangle tool) and draw over the
text that you would like to translate. For the Oval and Rectangle,
click once for one end point, and again for the final end point. For
the polygon, you click one time for each point on the polygon, and
double click to close the polygon. Be careful - there's no way to fix
mistakes except to erase the whole bubble. When you have finished,
the text should "disappear" - actually, it is just covered up by the
bubble, but if your bubbles don't have an outline on them, and a white
background, it might look like you've erased the text. You can always
toggle the display of the bubbles with the button up in the toolbar.
Once you have drawn your bubble, you can add a translation to it by
selected "New Translation" from the GMAO menu. The new translation
will be added to the last bubble the mouse was over. When you have
finished, you should save the file locally (File->Save) or send it to
the server if you are saving changes on the server. You can try that
with the GMAO->Send Page to Server command.

This other tutorial that I wrote up earlier shows a few more features
of GMAO.
You should use the AutoPolygon tool
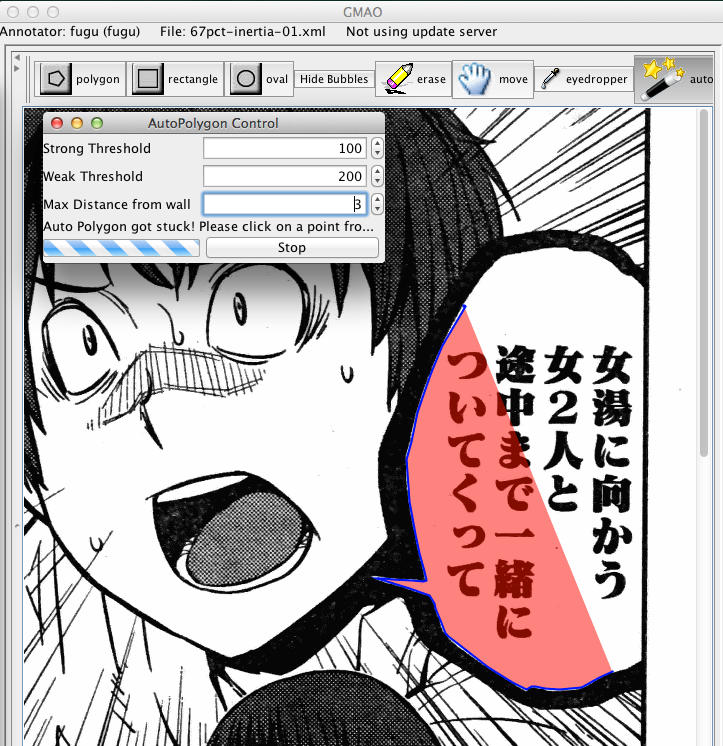
There is a new tool, "autoPoly". It looks like a magic wand. Click on it, and a new dialog box will open. It is kind of annoying because it is on top of everything. If you close it, click on the autoPoly tool again and it will open again. The control lets you set the strong and weak thresholds, and the max distance from the wall. Basically try these numbers: Strong 100, Weak: 200, Distance from Wall: 3.
To start the autoPoly, click anywhere within a bubble near the upper left. Make sure there is no black between where you click and the bubble wall. From there, autoPoly will trace the outline of the bubble. If it gets stuck, it will tell you, and you can click a place for it to continue from. Don't click many times, because then it starts up other instances, and things just go crazy. The control isn't great, because I only check at a single place when it should stop. I'll try to improve on that soonish. But anyway, give this tool a spin, it is super awesome.
Dave Evans
Last modified: Tue Apr 23 17:50:23 Eastern Daylight Time 2002