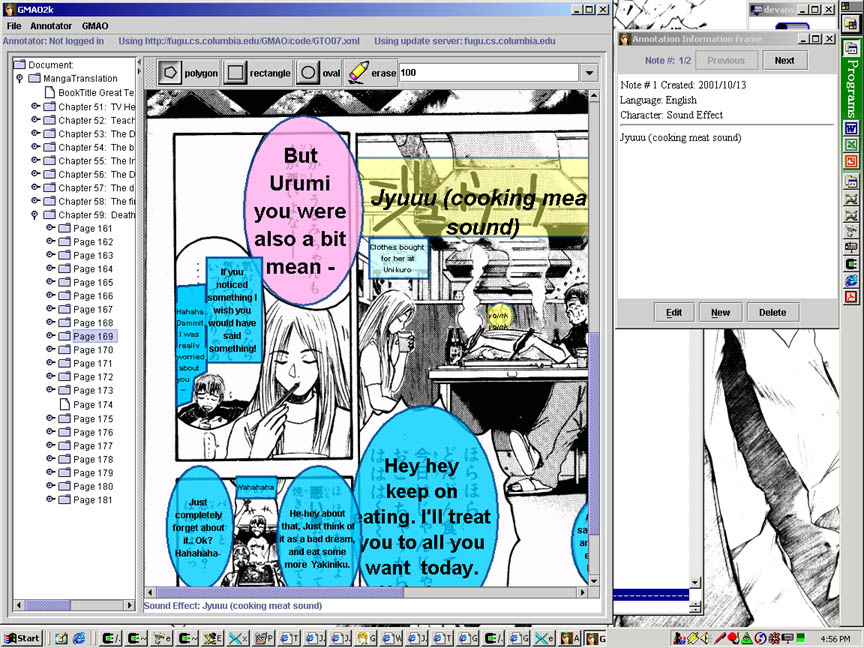
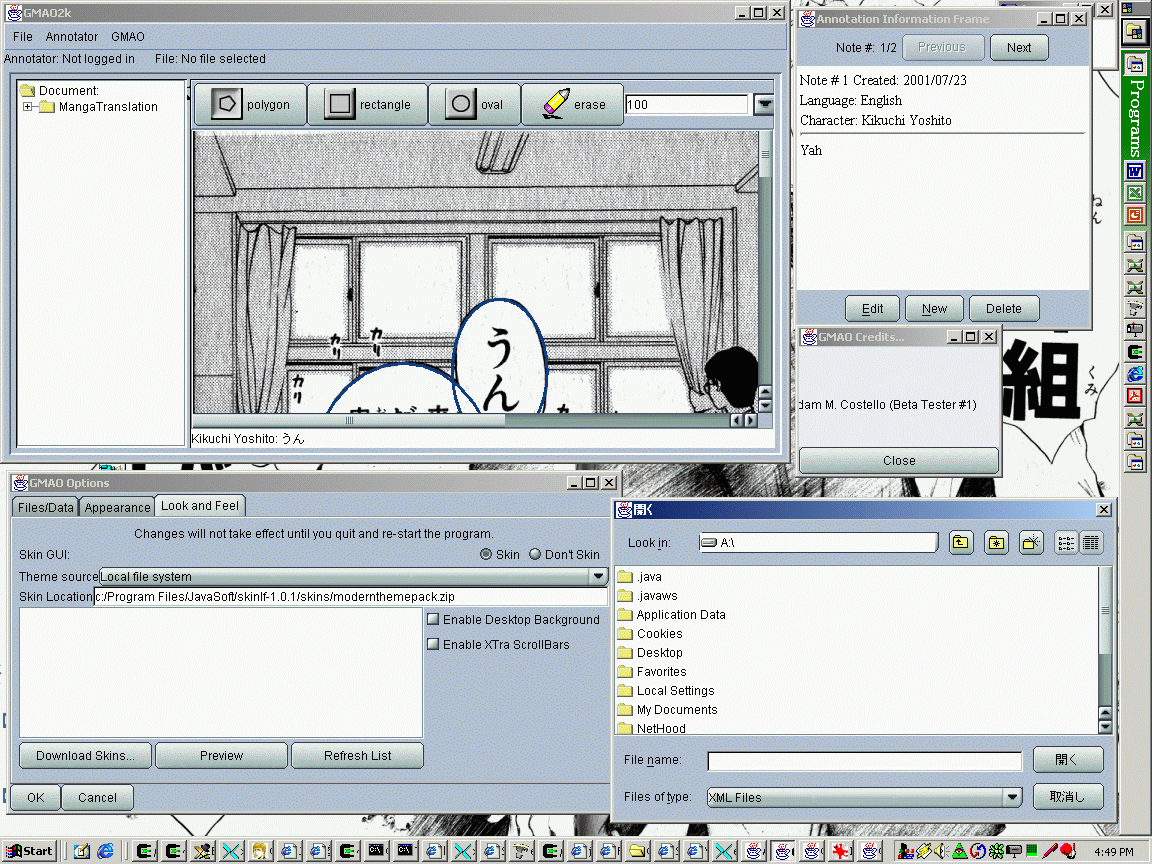
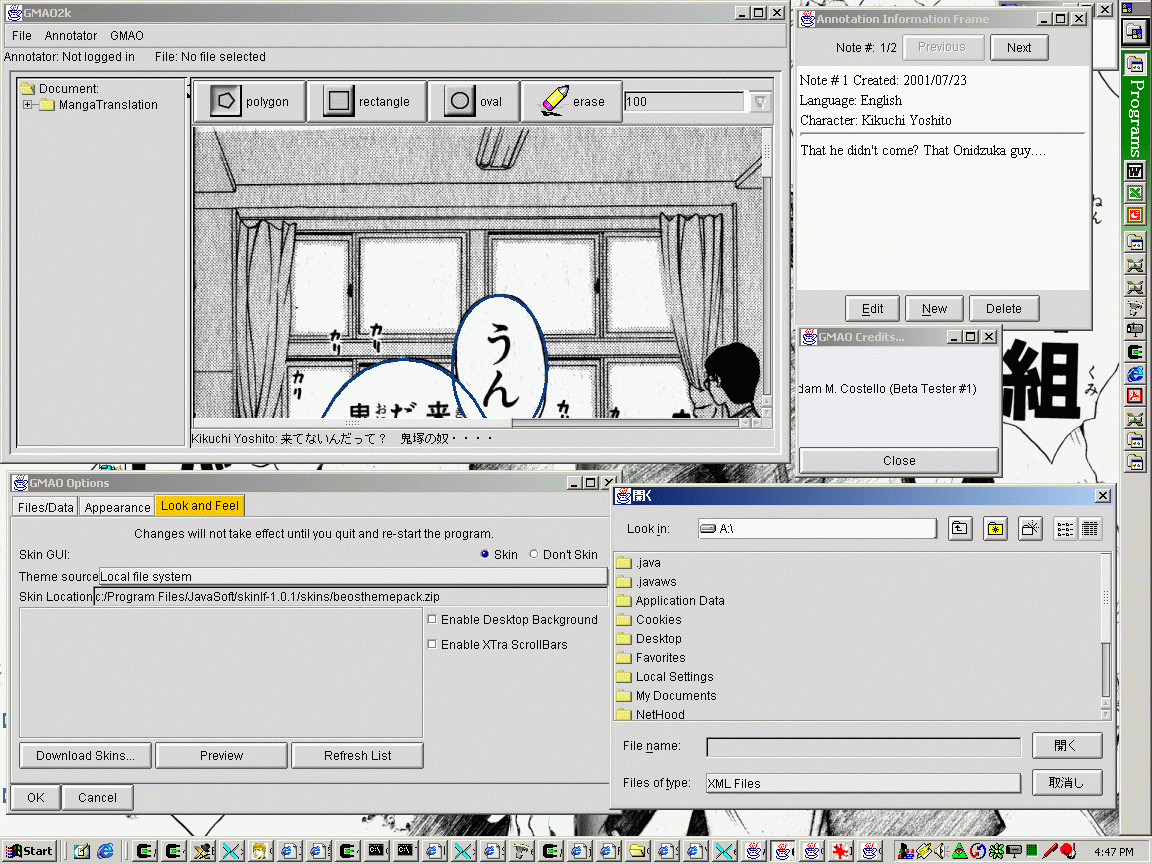
You should be faced with two windows, a large, horizontally-split one, and a small one. The larger window is the Annotation window, and is where most of the works goes on. The smaller one if the AnnotationInformation window. It just shows the current annotation, and lets you look at the other translations associated with it.
Your screen should look like this:
There are two windows - the main one (Annotation window) and the smaller one (Annotation Information window.) The small window shows the contents of the bubble that you have moved the mouse over. You can hide it by clicking the close box. You can always show the window again by selecting the "Show Annotation Information Window" in the "GMAO" menu.
On the left side of the Annotation window is a Tree display. You can click on the MangaDoc item to expose a list of chapters that have been translated, and expand the chapters to get to the page level. When you click on a page, that page will be loaded (loading the image over the web or locally, which will take some time) and displayed in the right-hand side of the Annotation window.
Currently, I'm displaying page 169 of GTO 7. As you see on the right, the translations are inserted into the regions that were drawn. You can modify the colors and fonts and so on using the "Options" item in the "GMAO" menu.
At the top of the interface, under the menu is some information. The first lists who you are logged in as. Under the "Annotator" menu, you can log in as an Annotator. All translations added are tracked based on the Annotator. In the middle, the file that is being translated is listed, then an indicator for whether or not you are using a Server to send updates to is listed.
Every time you click on a different page, if you made an changes, they are sent to the server if you have filled in a value for the updateServer in the Options dialouge. This is the only way to save changes to the remote server currently - the "Save" menu item only works for local files.
If you are using the remote server to do updates, then your log-in information must match the information that the remote server has for a particular ID. This means that the name and password for your ID must match what they are in the remote server. If they match, you will be logged in, otherwise, an error message will be displayed.
If you have not logged-in before, you might be able to create a new log-in. If the server allows you to create a new account, you just have to type in your id (I suggest your email address) your name (remember, you will have to type this same name on subsequent log-ins also! So don't forget it, or just use your reall name), and a password. You only get one chance for all of them, so make it good. If the server allows you to create accounts, you will then be logged in. Use the same information next time to log in again.
If the server does not accept new accounts, you have to request an account from the server administrator. Please contact the administrator and ask for an account. They might make one for you, and tell you the login/password/name info. They might not. :)
You have to fill out three fields. The first is the language. Type in the language you are filling in. Type it right. I don't do any checking on this field yet. Be consistent with what already exists ("English" and "Japanese").
Add in the character that is saying the dialouge. The character field is automatically text completed. When a character that it knows about is unambigiusly specified, it will be filled in. Be careful, because the selection doesn't work like it should...
Then fill in the translation, and click "ok". You have to be able to enter the language that you chose using your regular Java system. I don't have any input method madness going on.
To send an update to the server, you can either select a different page (BUG: Do not create a new page, and select that! It doesn't work!) and the changes will be sent to the server, or you can select the "Send Page to Server" menu option in the "GMAO" menu.
When an update is sent to the server, it might take a while. First, of course, there is the delay in network communication. Beyond that, the server will receive your update, apply the changes that it thinks make sense (for example, you cannot change other annotator's annotations, only add, or change your own) and then it creates a Javascript HTML page for the page that you changed, and re-creates the HTML Script for the entire manga (takes a little time, about 5 - 10 seconds depending.) When that is done, the dialouge box should go away, and you are free to continue working.
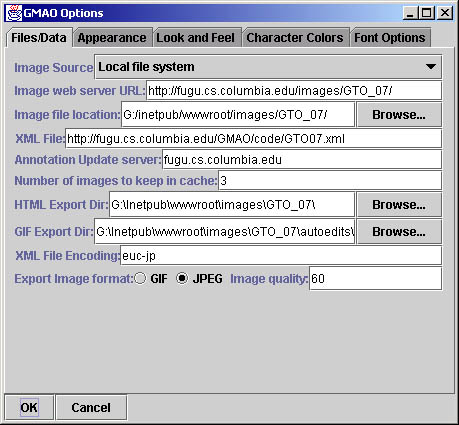
The XML file is the file you load. If you use "http://...." you can load a file over the web. Otherwise, you will use "file://..." but it is just easier to use the "Open" menu item to do that. If you type in the XML file, it also must exist and be accessible over the web. You can get to any of my GTO translations by just changing the number...
The Annotation Update server tells GMAO what server to send updates to. By default, it uses my server. So far, it is the only one that exists (that I know of.) But, you can change it if you want. If you don't want to use one, just put a blank space or something in there.
You can specify how many images GMAO should cache. By default, GMAO keeps the last 3 images loaded in memory. You can make it more or less.
HTML Export Dir specifies where created HTML pages will go. It must be a local directory on your machine. Same thing for GIF Export Dir. (It is also used for JPEGs...)
The File encoding is the file encoding that XML files are read / saved with. I use euc-jp because I write Japanese. You can use any file encoding that Java Supports. (About 50 or so.)
Finally, you can choose to export images as GIF or JPEG. If you use
JPEG, you can set the quality.
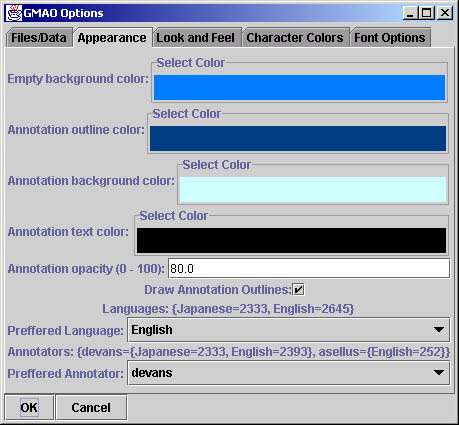
The Appearance options let you specify how GMAO will "look" in general. Here, you can select the empty background color (the color you see when you start it up. Pointless, I know), the color to use for Annotation outlines, and the default annotation background color. Click on the colors to bring up a color chooser. You can also select the default Text color.
If you don't want to draw a background on the annotations, select the background color, and click "Cancel" in the color select dialog. It will switch to say "None".
The cool thing is the annotation opacity. This is how opaque default annotations should be. A value of like 80 is what I use normally. If you uncheck the "Draw Annotation outlines" box, outlines for the annotations will not be drawn.
You can select the language that you prefer to be in the bubbles. Select it.
You can select the annotator who's translations you prefer as well. Select it. The language preference is "stronger" than the Annotator preference. It will always try to display some annotation in the language that you choose. If GMAO can't find a translation to match your preferences, you get a random (well, not really) translation.
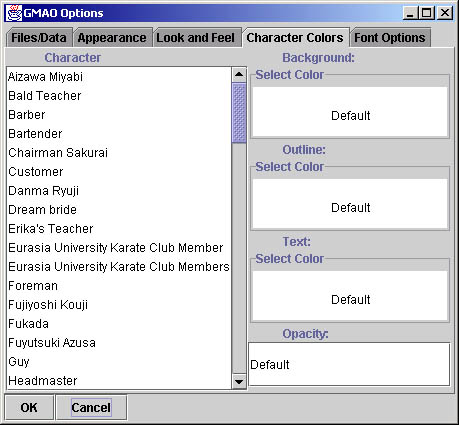
You can set the colors to use for an annotation based on the
"Character" field. This is cool because you can color different
characters' text different colors. Select the Character that you want
to choose a color for, and choose a color. You can set background
color, text color, outline color, and the opacity. GMAO will always
use the default values set in the "Appearance" panel if you don't
specify something.

You can also set the font to use based on the character. There should always be a selection for the Default Font, which is used if nothing is specified for a character. You can choose the font to use, the size, and whether the font is bold or italic.
If you select "Dynamically resize Fonts" then GMAO will ignore the font size information you selected, and choose the font size that is the largest that can fit into a bubble without overflowing. It will respect the min and max font sizes though. Note that this option will slow GMAO down a bit, but you probably won't notice it, and it looks really nice.